Hi friends, in this tutorial, you will learn how to export data from MySQL to excel using PHP. It is often required in the case of web development or any kind of web application and there are various packages available online to do this task but here I have explained without any package.
Also read, How to Import Export Excel File in Laravel 8 using Maatwebsite Excel Package
This is very simple and no need to install any third-party package to export data from MySQL database. In order to do so, follow the below steps given below.
Required steps to export data from MySQL to excel using PHP
Step 1:- Create a table in your MySQL database.
DDL information of the table
CREATE TABLE employee ( id int(10) NOT NULL AUTO_INCREMENT, name varchar(255) COLLATE utf8mb4_unicode_ci NOT NULL, age int(20) NOT NULL, department varchar(255) COLLATE utf8mb4_unicode_ci NOT NULL, created_at timestamp NOT NULL DEFAULT CURRENT_TIMESTAMP, updated_at timestamp NOT NULL DEFAULT CURRENT_TIMESTAMP, PRIMARY KEY (id) ) ENGINE=MyISAM AUTO_INCREMENT=9 DEFAULT CHARSET=utf8mb4 COLLATE=utf8mb4_unicode_ci
Step 2:- Establish the database connection as shown below
<?php
$servername='localhost';
$username="root";
$password="";
try
{
    $con=new PDO("mysql:host=$servername;dbname=myproject_db",$username,$password);
    $con->setAttribute(PDO::ATTR_ERRMODE,PDO::ERRMODE_EXCEPTION);
    //echo 'connected';
}
catch(PDOException $e)
{
    echo '<br>'.$e->getMessage();
}
?>
Step 3:- Create an HTML file inside the root directory of your local server i.e. www folder of my WAMP server.
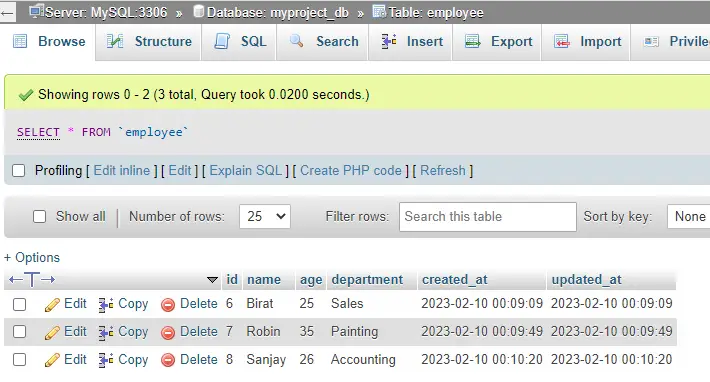
Step 4:- Now, you must have some data inserted in your table as shown below.

Step 5:- PHP script to display the table data.
<?php
  include('dbconnect.php');
  $sql = "SELECT * from employee ORDER BY id DESC";
   $stmt = $con->prepare($sql);
   $stmt->execute();
   $data = $stmt->fetchAll(PDO::FETCH_ASSOC);
?>
Step 6:- Create another file with a .php extension called export_data.php
Step 7:- PHP script to export the table data from the HTML file.
<?php
include 'dbconnect.php';

 //export table data to excel

if(isset($_GET['export']))
{

  $output = "";

        $output .= '<table class="table table-bordered" border="1">
                    <tr>
                          <th scope="col">Sl</th>
                          <th scope="col">Name</th>
                          <th scope="col">Age</th>
                          <th scope="col">Department</th>
                    </tr>';

   $sql = "SELECT * from employee ORDER BY id DESC";
   $stmt = $con->prepare($sql);
   $stmt->execute();
   $data = $stmt->fetchAll(PDO::FETCH_ASSOC);

foreach($data as $key=>$value){

    $output .= '<tr>
                         <td>'.($key+1).'</td>
                         <td>'.$value['name'].'</td>
                         <td>'.$value['age'].'</td>
                         <td>'.$value['department'].'</td>

                    </tr>';
        }

        $output .= '</table>';

        $filename = "table_data_export_".date('Ymd') . ".xls";
        header("Content-Type: application/vnd.ms-excel");
        header("Content-Disposition: attachment; filename=\"$filename\"");
        echo $output;
      }
?>
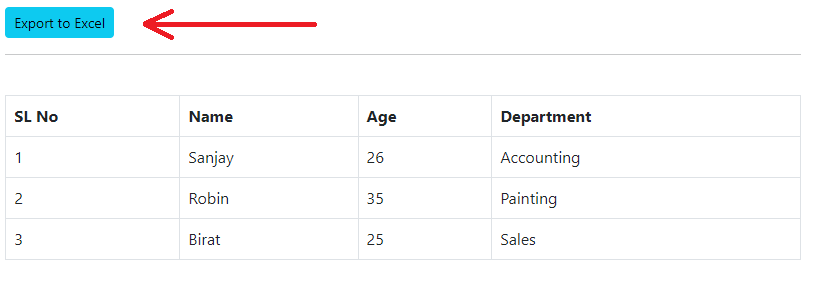
Step 8:- Now, display the data from the created table of your MySQL database in an HTML file as shown below.
mysqltoexcel.php
<?php
  include('dbconnect.php');
  $sql = "SELECT * from employee ORDER BY id DESC";
   $stmt = $con->prepare($sql);
   $stmt->execute();
   $data = $stmt->fetchAll(PDO::FETCH_ASSOC);
?>

<!DOCTYPE html>
<html lang="en">
<head>
  <title>Bootstrap Example</title>
  <meta charset="utf-8">
  <meta name="viewport" content="width=device-width, initial-scale=1">
  <link href="https://cdn.jsdelivr.net/npm/bootstrap@5.2.3/dist/css/bootstrap.min.css" rel="stylesheet">
  <script src="https://cdn.jsdelivr.net/npm/bootstrap@5.2.3/dist/js/bootstrap.bundle.min.js"></script>
</head>
<body>

<div class="container mt-3" style="width:60%;">
  <a href="/myprojects/export_data.php?export" class="btn btn-info btn-sm">Export to Excel</a><hr>
  <br>
  <table class="table table-bordered" id="myTable">
    <thead>
      <tr>
        <th>SL No</th>
        <th>Name</th>
        <th>Age</th>
        <th>Department</th>
      </tr>
    </thead>
    <tbody>
      <?php
        if(count($data)>0)
        {
          foreach($data as $key=>$value)
          {
          ?>
            <tr>
                    <td><?php echo $key+1; ?></td>
                    <td><?php echo $value['name'];?></td>
                    <td><?php echo $value['age'];?></td>
                    <td><?php echo $value['department'];?></td>
                  </tr>
            <?php
          }
        }
      ?>

    </tbody>
  </table>
</div>
<script src="//ajax.googleapis.com/ajax/libs/jquery/2.2.4/jquery.min.js"></script>
<script src="jquery-table2excel-master/src/jquery.table2excel.js"></script>
</body>
</html>
Step 9:- Open the browser and run the HTML file and click the export button to download the data in excel format i.e xls or xlsx format as shown below.

Now, you can open the downloaded file and check the table data in the excel file whether the data comes properly or not.
