Razorpay payment gateway integration in PHP

I am a Laravel developer and well-versed in PHP language along with other technologies such as Javascript, Bootstrap, CSS, Node JS, etc. I am here to share my knowledge and experiences with everyone.
Hi friends, in this tutorial, you will learn the procedure of Razorpay payment gateway integration in PHP. Razorpay is one of the most reliable gateways and it is very simple to integrate than other gateways it accepts almost all the payment options such as debit, credit, net banking, UPI, and other digital wallets. If you want to integrate Razorpay then you have come to the right place. So, I will explain in detail with a step-by-step process.
Also read, Integrate Instamojo payment gateway in PHP step by step
Steps for Razorpay payment gateway integration in PHP
Step 1:- Create an account in Razorpay.
Step 2:- After successful login, go to the right side of the dashboard and switch to test mode as shown below.

Step 3:- Next, go to the settings menu on the left side of your dashboard and generate the test keys as shown below
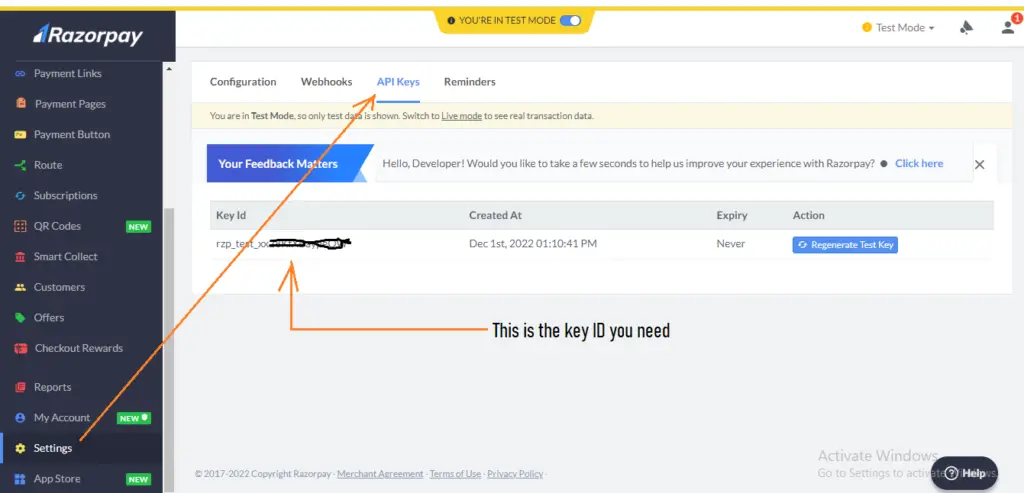
Razorpay payment gateway integration in PHP
Step 4:- Now, create a folder inside the root directory of your local server.
Step 5:- Now, create a file (index.php) inside that folder along with some inputs such as payee name, amount, and item description as shown below
<!DOCTYPE html>
<html lang="en">
<head>
  <title>Razorpay</title>
  <meta charset="utf-8">
  <meta name="viewport" content="width=device-width, initial-scale=1">
  <link href="https://cdn.jsdelivr.net/npm/bootstrap@5.2.3/dist/css/bootstrap.min.css" rel="stylesheet">
  <script src="https://cdn.jsdelivr.net/npm/bootstrap@5.2.3/dist/js/bootstrap.bundle.min.js"></script>
</head>
<body>

<div class="container mt-3" style="width: 50%;">
  <h2>Razorpay Payment Integration in PHP</h2>
  <form action="#">
    <div class="mb-3 mt-3">
      <label for="email">Payee Name:</label>
      <input type="email" class="form-control" id="name" placeholder="Enter Payee Name" name="payee_name">
    </div>
    <div class="mb-3">
      <label for="pwd">Amount:</label>
      <input type="number" class="form-control" id="amount" placeholder="Enter Amount" name="amount">
    </div>
    <div class="mb-3">
      <label for="pwd">Item Description:</label>
      <input type="text" class="form-control" id="description" placeholder="Enter Description" name="description">
    </div>
    <button type="button" class="btn btn-primary" id="rzp-button1" onclick="pay_now()">Pay</button>
  </form>
</div>
</body>
</html>
Step 6:- Now paste the javascript code inside the index.php file as shown below
<script src="https://code.jquery.com/jquery-3.6.1.min.js"></script>
<script src="https://checkout.razorpay.com/v1/checkout.js"></script>
<script type="text/javascript">
    function pay_now(){
          //get the input from the form
          var name = $("#payee_name").val();
          var amount = $("#amount").val();
          var actual_amount = amount*100;
          var description = $('#description').val();
          //var actual_amount = amount;
          var options = {
            "key": "rzp_test_xx28KfXBaypeQW", // Enter the Key ID generated from the Dashboard
            "amount": actual_amount, // Amount is in currency subunits. Default currency is INR. Hence, 50000 refers to 50000 paise
            "currency": "INR",
            "name": name,
            "description": description,
            "image": "razorpay.png",
            //"order_id": "order_IluGWxBm9U8zJ8", //This is a sample Order ID. Pass the `id` obtained in the response of Step 1
            "handler": function (response){
                console.log(response);
                $.ajax({

                    url: 'process_payment.php',
                    'type': 'POST',
                    'data': {'payment_id':response.razorpay_payment_id,'amount':actual_amount,'name':name},
                    success:function(data){
                        console.log(data);
                      window.location.href = 'thank_you.php';
                    }

                });
                // alert(response.razorpay_payment_id);
                // alert(response.razorpay_order_id);
                // alert(response.razorpay_signature)
            },

        };
        var rzp1 = new Razorpay(options);
        rzp1.on('payment.failed', function (response){
                alert(response.error.code);
                alert(response.error.description);
                alert(response.error.source);
                alert(response.error.step);
                alert(response.error.reason);
                alert(response.error.metadata.order_id);
                alert(response.error.metadata.payment_id);
        });
        document.getElementById('rzp-button1').onclick = function(e){
            rzp1.open();
            e.preventDefault();
        }
    }
</script>
Step 7:- Establish the database connection in PHP so that you can insert the data with the Razorpay payment id.
Step 8:- Create a table in your database as shown below
DDL information of the table
CREATE TABLE razorpay_payment ( id int(10) NOT NULL AUTO_INCREMENT, name varchar(50) COLLATE utf8mb4_unicode_ci NOT NULL, amount int(10) NOT NULL, payment_status varchar(50) COLLATE utf8mb4_unicode_ci NOT NULL, payment_id varchar(100) COLLATE utf8mb4_unicode_ci NOT NULL, paid_on datetime NOT NULL, PRIMARY KEY (id) ) ENGINE=MyISAM DEFAULT CHARSET=utf8mb4 COLLATE=utf8mb4_unicode_ci
Step 9:- Create a file process_payment.php to submit the payment details inside the database after successful payment.
Complete Code:-
<!DOCTYPE html>
<html lang="en">
<head>
  <title>Razorpay</title>
  <meta charset="utf-8">
  <meta name="viewport" content="width=device-width, initial-scale=1">
  <link href="https://cdn.jsdelivr.net/npm/bootstrap@5.2.3/dist/css/bootstrap.min.css" rel="stylesheet">
  <script src="https://cdn.jsdelivr.net/npm/bootstrap@5.2.3/dist/js/bootstrap.bundle.min.js"></script>
</head>
<body>

<div class="container mt-3" style="width: 50%;">
  <h2>Razorpay Payment Integration in PHP</h2>
  <form action="#">
    <div class="mb-3 mt-3">
      <label for="email">Payee Name:</label>
      <input type="email" class="form-control" id="name" placeholder="Enter Payee Name" name="payee_name">
    </div>
    <div class="mb-3">
      <label for="pwd">Amount:</label>
      <input type="number" class="form-control" id="amount" placeholder="Enter Amount" name="amount">
    </div>
    <div class="mb-3">
      <label for="pwd">Item Description:</label>
      <input type="text" class="form-control" id="description" placeholder="Enter Description" name="description">
    </div>
    <button type="button" class="btn btn-primary" id="rzp-button1" onclick="pay_now()">Pay</button>
  </form>
</div>

</body>
</html>
<script src="https://code.jquery.com/jquery-3.6.1.min.js"></script>
<script src="https://checkout.razorpay.com/v1/checkout.js"></script>
<script type="text/javascript">
    function pay_now(){
          //get the input from the form
          var name = $("#payee_name").val();
          var amount = $("#amount").val();
          var actual_amount = amount*100;
          var description = $('#description').val();
          //var actual_amount = amount;
          var options = {
            "key": "rzp_test_xx28KfXBaypeQW", // Enter the Key ID generated from the Dashboard
            "amount": actual_amount, // Amount is in currency subunits. Default currency is INR. Hence, 50000 refers to 50000 paise
            "currency": "INR",
            "name": name,
            "description": description,
            "image": "razorpay.png",
            //"order_id": "order_IluGWxBm9U8zJ8", //This is a sample Order ID. Pass the `id` obtained in the response of Step 1
            "handler": function (response){
                console.log(response);
                $.ajax({

                    url: 'process_payment.php',
                    'type': 'POST',
                    'data': {'payment_id':response.razorpay_payment_id,'amount':actual_amount,'name':name},
                    success:function(data){
                        console.log(data);
                      window.location.href = 'thank_you.php';
                    }

                });
                // alert(response.razorpay_payment_id);
                // alert(response.razorpay_order_id);
                // alert(response.razorpay_signature)
            },

        };
        var rzp1 = new Razorpay(options);
        rzp1.on('payment.failed', function (response){
                alert(response.error.code);
                alert(response.error.description);
                alert(response.error.source);
                alert(response.error.step);
                alert(response.error.reason);
                alert(response.error.metadata.order_id);
                alert(response.error.metadata.payment_id);
        });
        document.getElementById('rzp-button1').onclick = function(e){
            rzp1.open();
            e.preventDefault();
        }
    }
</script>
Explanation of the above code:-
As soon as the form is submitted, we will get the input values using jquery and pass them to the options variable along with the key ID generated from the Razorpay dashboard.
When you pass the input values using jquery then do not forget to multiply the amount by 100 because the currency is INR which means you are putting the amount as paisa which is why you need to multiply by 100.
Now, you will see a Razorpay interface after giving the phone number and email as shown below. Here you can view various options for payments.
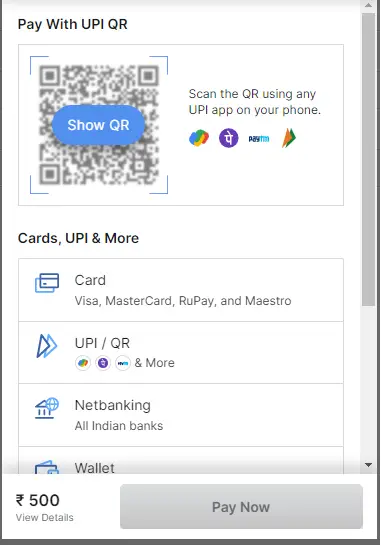
Razorpay payment gateway integration in PHP
- Now, inside the handler function, if you console the response then you will see the response values as shown below. Note that when you console then comment on the ajax request otherwise you can not see the response on the console.
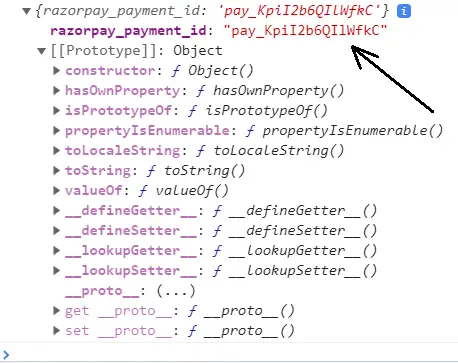
Razorpay payment gateway integration in PHP
Now we will use the razorpay_payment_id shown on the console and send it with the amount and payee name in the ajax request to the URL: process_payment.php.
Now, in the process_payment.php file, include your database connection file (dbconnect.php) as shown below
<?php
$servername='localhost';
$username="root";
$password="";
try
{
    $con=new PDO("mysql:host=$servername;dbname=myproject_db",$username,$password);
    $con->setAttribute(PDO::ATTR_ERRMODE,PDO::ERRMODE_EXCEPTION);
    //echo 'connected';
}
catch(PDOException $e)
{
    echo '<br>'.$e->getMessage();
}
?>
- Now, inside the process_payment.php, get the razorpay_payment_id and other data sent from the ajax request and save them in the MySQL database as shown below
<?php
//connect the database
include 'dbconnect.php';

//get the payment details from payment page

if(isset($_POST['payment_id']) && isset($_POST['amount']) && isset($_POST['name']))
{
    $paymentId = $_POST['payment_id'];
    $amount = $_POST['amount'];
    $name = $_POST['name'];

    //insert data into database
    $sql="INSERT INTO razorpay_payment(name,amount,payment_status,payment_id)VALUES('$name','$amount','paid','$paymentId')";
    $stmt=$con->prepare($sql);
    $stmt->execute();
}
?>
- Now, inside the success function, you can redirect to a thank you page after successful payment as shown below.
window.location.href = 'thank_you.php';
thankyou.php
<!DOCTYPE html>
<html lang="en">
<head>
  <title>Bootstrap Example</title>
  <meta charset="utf-8">
  <meta name="viewport" content="width=device-width, initial-scale=1">
  <link href="https://cdn.jsdelivr.net/npm/bootstrap@5.2.3/dist/css/bootstrap.min.css" rel="stylesheet">
  <script src="https://cdn.jsdelivr.net/npm/bootstrap@5.2.3/dist/js/bootstrap.bundle.min.js"></script>
</head>
<body>

<div class="container mt-3">
  <div class="alert alert-success alert-dismissible">
    <button type="button" class="btn-close" data-bs-dismiss="alert"></button>
    <strong>Success!</strong> Payment Paid Successfully.
  </div>
</div>

</body>
</html>
Conclusion:- I hope this tutorial will help you understand the concept. if there is any doubt then please leave a comment below


